I started gardening before I could ride a bike. I was encouraged to pull plants apart, to look closely; I was given space to play with them rather than actually grow them. As it turned out, I picked up many skills.
A lot of gardening is not much fun for children – particularly in early spring, when it’s all wet, slimy leaves, cold fingers and endless weeds that are hard to pull. But while gardening right now might be tiresome, but plants aren’t. There’s a world of wonder to explore. Here are projects using materials that are easy to find – and which can all be done indoors because, let’s face it, it will probably be raining.
Create plants from kitchen scraps
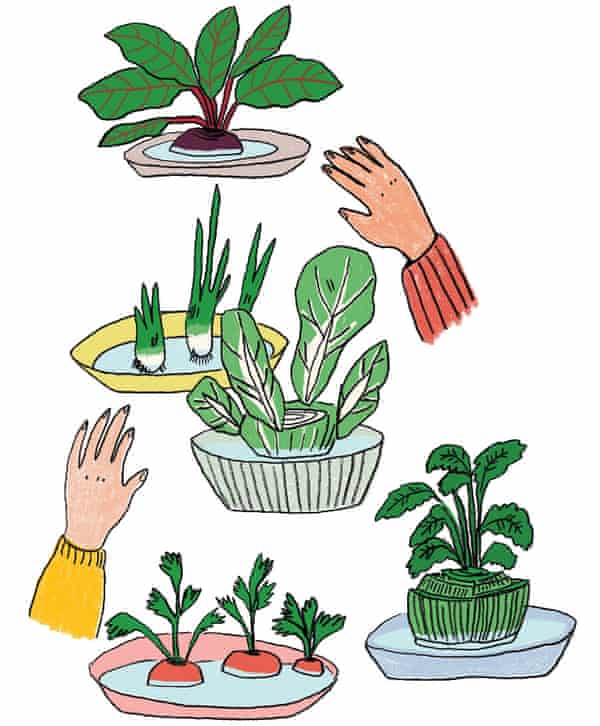
Many vegetable tops will re-sprout with just a little water. Better still, their new growth is soft, tender and tasty (yes, you can eat them). Ideal for this are carrots, beetroot, turnips and swedes.

You need 2-5cm of the top of the root, ie the bit that is usually cut off before cooking. Sit these, tops pointing up, in a little water in a saucer on a bright windowsill, and after a few days you’ll see new growth appear. For celery, onions, spring onions, leeks, lettuce and pak choi, you need the base of the vegetable. Cut off 5-8cm and soak in a little water in a saucer. The best lettuces for this are romaine or little gem. After a week you’ll see new growth.
If you’re feeling adventurous, you can try growing some of these in the dark. This is known as “forcing”, because you are forcing it to grow without light, which changes the colour of the leaves. Beetroot works particularly well using this method. It needs to be somewhere warm, but not so warm that it will dry out – so not too close to a radiator.
You’ll need two pots: one for the beetroot top and a larger one to cover it. Plant the beetroot top in the smaller pot with some compost; rest its flat bottom on the surface of the soil. As long as the compost feels damp, you don’t need to water, but if it’s bone dry, sprinkle a little around the beetroot. Now cover any drainage holes in the large pot with tape, or by stuffing newspaper in the bottom, to stop light getting in, and place it upside down over the beetroot.
After a week, check to see how it is growing. Without light, it won’t produce any green pigment in the leaves: they’ll be white, with neon pink midribs. These are edible and look lovely in a salad.
Grow a new succulent from a leaf
Plant cells are amazing: one day they might be a root, but if that’s not working out for them, they can quickly become a stem or a shoot. Succulent plants are very good at vegetative reproduction. If a leaf should fall off, perhaps blown by the wind or knocked off by a wild animal, it can quickly develop into a new plant with roots.
Some of the best succulents to propagate are echeverias, kalanchoes, jade plants, burro’s-tail sedum, and jelly bean sedum. Gently tug at one of the bottom leaves that looks healthy – you need to collect a few. Fill a small tray (a takeaway tray with holes poked in the bottom is ideal) with equal parts compost and grit or sand, which will prevent the soil from getting too damp and heavy.
Water the compost in and let all the water drain away before you gently nudge your succulent leaves on to the surface of the compost. The leaves don’t want to be buried, but they need to make contact with the soil. Don’t water the tray again until you see new roots (too much water will rot the leaves). Then give it the barest minimum of water, ideally misting them once a week to encourage the roots to grow. The tray needs to be kept somewhere bright, but out of direct sunlight.
After a while, you’ll see tiny baby leaves appear as the leaf turns itself into a new plant. After several months, you’ll have a lot of baby succulents that can be planted up into individual pots.
Turn a sweet potato into a houseplant

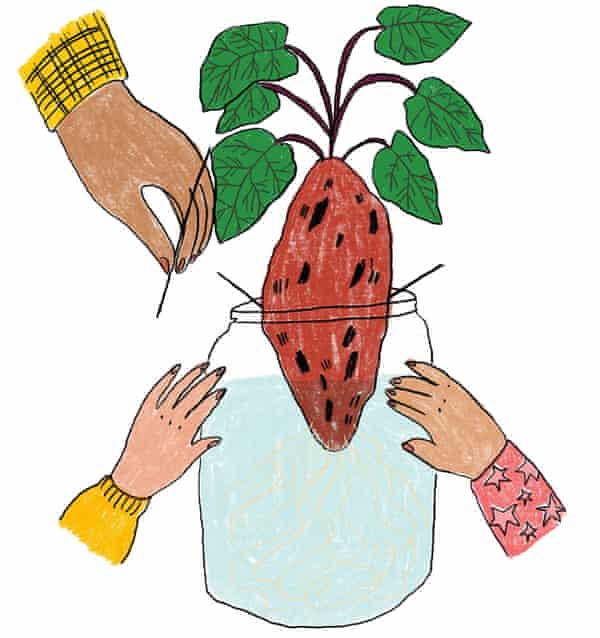
Sweet potatoes can be sprouted as you would an avocado pip. The sweet potato grows as a rambling vine with heart-shaped leaves, and makes a good houseplant.
You’ll need a sweet potato, a big jam jar filled with warm water, some toothpicks and a warm, bright spot. Stick three toothpicks into the potato about halfway down, around the middle, and rest these on the rim of the jam jar. Half the potato – make sure it’s the pointier end – will sit inside the jar in an inch or so of water.
Place on a warm windowsill; top up with water if it dries out. It will take about two weeks for leaves and roots to appear. When the roots hit the bottom of the jar, and there are numerous leaves, plant the potato in its proper home: a bigger pot. Choose one that is big enough to take the roots without having to bend or fold them. The tuber needs to sit in the compost, ensuring that any sprouting leaves are not buried; direct sunlight will scorch the leaves. Once you see roots coming through the drainage holes in the bottom of your pot, then it’s time for a bigger container.
Make your own plant pot…
You will find some of the best pots for planting in your bin. Tetra Paks used for juices, oat milks and soy milks are perfect, because the insides are coated in plastic, so they won’t rot. Better still, you can make a nice long pot, with lots of room for young roots to develop. They are particularly good for growing tomato, courgette and pumpkin plants, which all need to be sown in the next month or so.
Cut off the top quarter of the box and discard; wash the carton and let it dry. Poke about six drainage holes in the bottom, no bigger than the width of a pencil. Now you can paint it: use up the end of an emulsion can, or acrylic paints. Once it’s dry, you have a blank canvas, so you can get decorating with pens, glitter and stickers.
Fill the pot with compost to the top, shake it a little to settle the soil – and now it’s ready for whatever you want to plant in it. If it’s a seed, it needs to go in the middle (sweet peas, garden peas and herbs such as basil and coriander are all good to sow now; plant no more than five seeds per pot). Gently press a small hole in the centre, no deeper than 1cm, and drop your seed in. Cover with a little compost, water, keep it somewhere warm and bright – and wait!
…and watering can
You can make a watering can out of a plastic milk carton (a litre size, or bigger). The best watering cans produce soft, fine droplets, like rain, rather than a big gush of water. On a traditional watering can this is called a rose, but the milk jug version works just as well.
You’ll need a hammer, a nail, and an old piece of wood. Remove the lid of the milk carton and place it upside down on your bit of wood. Using the hammer and nail, bash holes into the lid – the more the merrier. Fill the carton with water and place the lid back on top tightly.
Make a lentil farm
Create your own micro windowsill farm using dried lentils, mung beans or chickpeas from your kitchen cupboard. It could be an orderly farm, with fences and farmers, or you could let dinosaurs run riot through the “fields”. Mow the fields with scissors and learn about regrowth, or pull up the crops to see what happens to the seed.
You’ll need a seed tray (a large takeaway tray from the recycling bin will do) and something to act as a drip tray underneath; use foil if you don’t have one. Fill the seed tray with compost: the terrain doesn’t need to be flat, so you can create small mounds to act as hills. Don’t make these too close to the edge or you might have a landslide.
Raid the store cupboard for anything that might sprout: popcorn kernels, coriander, whole lentils (split lentils won’t germinate), mung beans, chickpeas and dried peas are all ideal. Gently push each seed into the compost so it is just buried. Water to get your crops growing – remember, seeds prefer gentle watering. Place your farm somewhere light and warm, where you can keep an eye on everyone.
• Grow, Forage And Make: Fun Things To Do With Plants, by Alys Fowler, with illustrations by Heidi Griffiths, is published by Bloomsbury on 18 March. To order a copy, visit guardianbookshop.com
from Lifestyle | The Guardian https://ift.tt/3jIOTKr
via IFTTT

comment 0 Comment
more_vert